Kling AI Image to Video (2026): How to Turn Images into Cinematic Videos
Artificial intelligence has completely changed the way videos are created. Just a few years ago, producing a cinematic animation from a single photo required advanced editing skills, expensive software, and hours of manual work. Today, that process takes only a few minutes.
One of the most impressive tools leading this transformation is Kling AI Image to Video. Instead of building an animation frame by frame, Kling AI analyzes your image, understands the scene, and generates smooth, realistic motion that often looks surprisingly natural.
Whether you’re a YouTube creator, digital marketer, filmmaker, designer, or simply experimenting with AI-generated content, learning how to use Kling AI Image to Video can dramatically improve your workflow while saving both time and money.
In this guide, you’ll learn everything you need to know—from uploading your first image to writing effective prompts, choosing the right settings, avoiding common mistakes, and creating cinematic animations that actually look professional.
💡 New to the platform? Before diving into the Image to Video workflow, we recommend reading our complete Kling AI Tutorial to understand the dashboard, generation options, and beginner workflow. It will make the rest of this guide much easier to follow.
🚀 Ready to Turn Your Images Into Cinematic Videos?
Bring your photos and AI-generated artwork to life with Kling AI Image to Video. Upload an image, add a simple prompt, and start creating realistic cinematic animations in minutes.
👉 Try Kling AI Image to Video for Free
What Is Kling AI Image to Video?
Kling AI Image to Video is one of the platform’s flagship features that converts a single still image into a dynamic video using artificial intelligence.
Instead of simply adding zoom effects or basic transitions, Kling AI predicts realistic movement based on the content of the image. Trees can sway naturally in the wind, water can ripple, clouds may drift across the sky, and characters can subtly move, blink, or turn their heads depending on the prompt and motion settings.
Unlike traditional video editors, the AI doesn’t require manually defining every animation. It understands depth, lighting, perspective, and visual context before generating entirely new frames that blend smoothly together.
This makes it especially useful for creators who want to produce professional-looking videos without spending hours learning complex editing software.
Some of the most popular use cases include:
- Creating cinematic landscape videos from photographs.
- Animating AI-generated artwork.
- Bringing old family photos to life.
- Producing YouTube B-roll footage.
- Creating TikTok and Instagram Reels.
- Generating marketing videos from product images.
- Making fantasy and storytelling videos for social media.
For many creators, Kling AI Image to Video has become an essential tool because it significantly reduces production time while maintaining impressive visual quality.
Why Creators Prefer Kling AI Image to Video
The market is now full of AI video generators, but Kling AI has gained attention for one important reason:
Its motion feels believable.
Many AI tools simply stretch pixels or create unrealistic object movement. Kling AI, however, focuses heavily on motion consistency and scene physics, making animations appear much more natural.
Some of its strongest advantages include:
Realistic Motion Generation
Instead of randomly moving every object, Kling AI understands which elements should remain stable and which should move naturally.
For example:
- Water flows instead of simply shaking.
- Hair follows realistic movement.
- Trees sway with believable wind direction.
- Camera motion feels cinematic rather than artificial.
Excellent Prompt Interpretation
Another reason creators love Kling AI Image to Video is its ability to understand detailed prompts.
Rather than ignoring descriptive language, Kling AI can interpret instructions such as:
- cinematic lighting.
- slow camera dolly.
- dramatic sunset.
- shallow depth of field.
- volumetric lighting.
- soft breeze.
- realistic reflections.
The better your prompt, the better your final animation.
If you haven’t already, our Best Kling AI Prompts collection contains ready-to-use examples that consistently produce cinematic results.
High-Quality Video Output
Professional creators also appreciate the overall image quality.
Compared to many competing AI generators, Kling AI typically delivers:
- Sharper textures.
- Better lighting consistency.
- More stable object motion.
- Cleaner facial animation.
- Fewer visual artifacts.
These improvements become especially noticeable when creating landscape scenes or realistic cinematic sequences.
How to Use Kling AI Image to Video
One of the biggest reasons beginners enjoy using Kling AI is that the workflow is surprisingly straightforward.
Even if you’ve never generated an AI video before, you can usually create your first animation in just a few minutes.
Here’s the complete process.
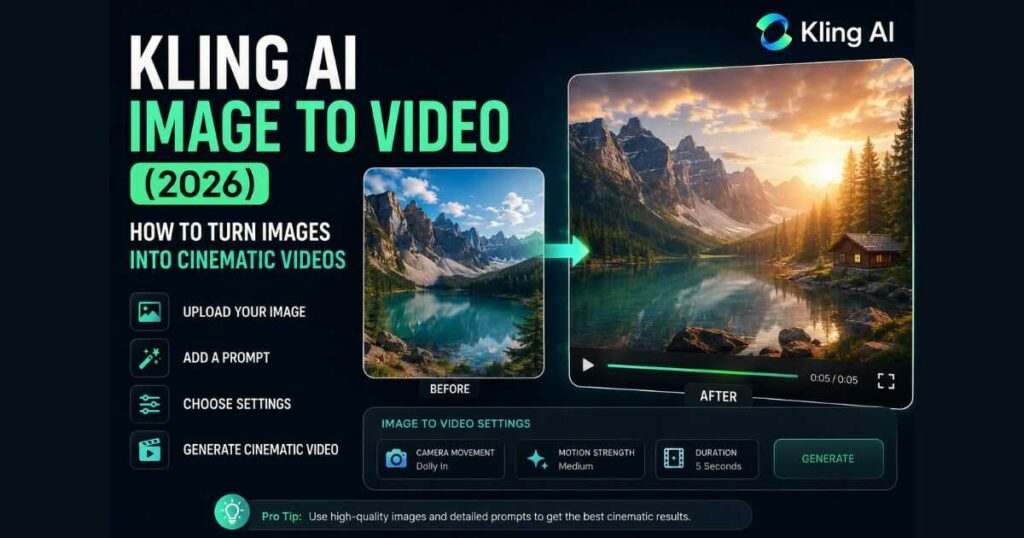
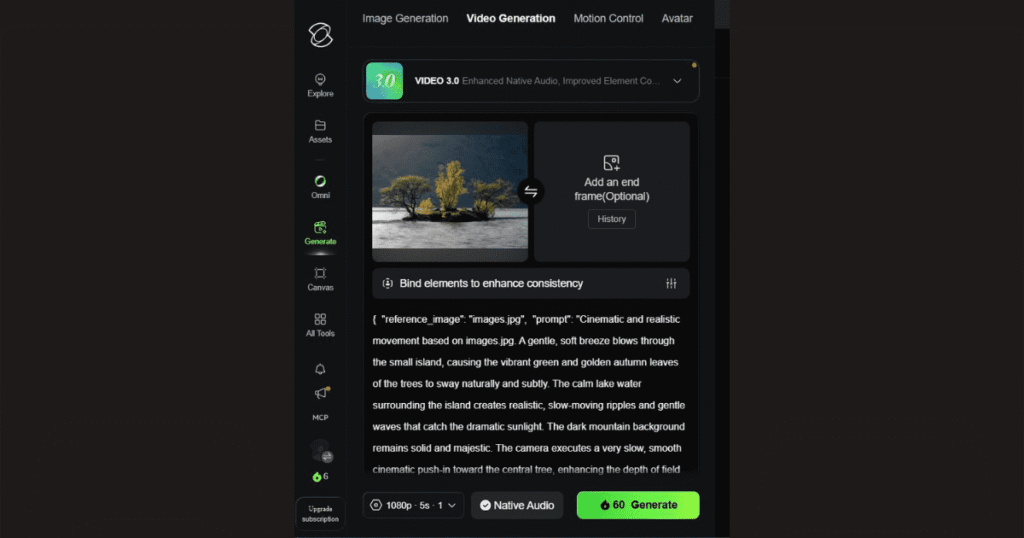
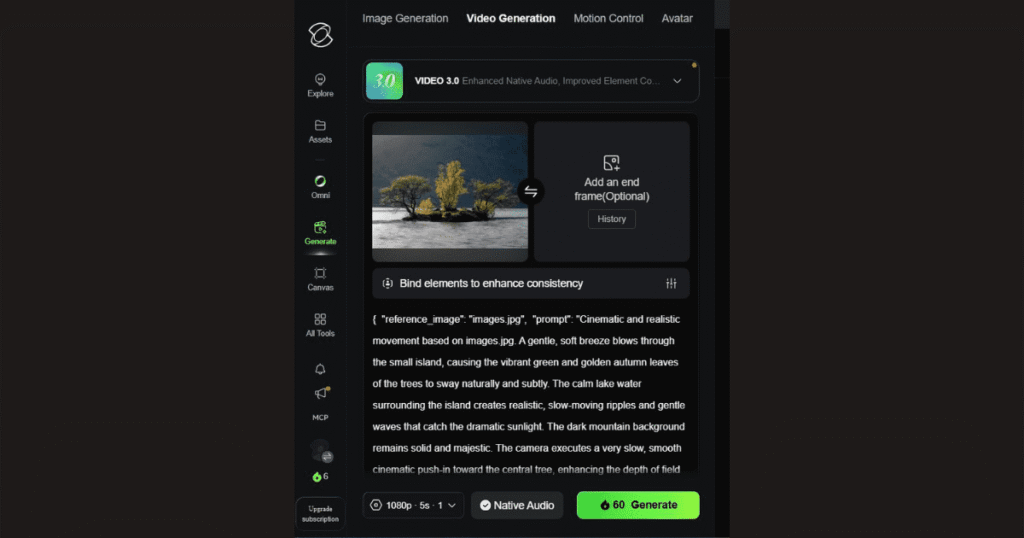
Step 1 — Upload Your Image
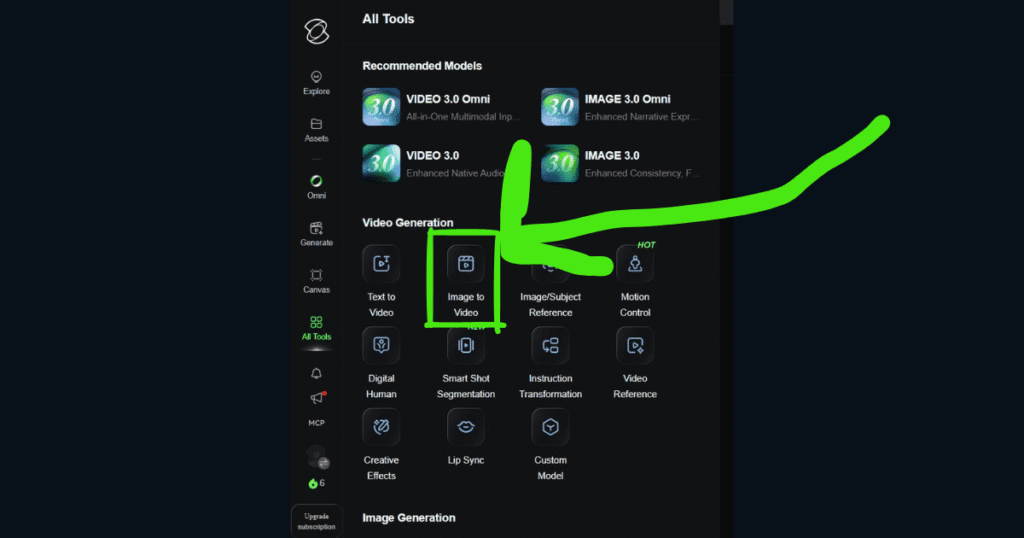
After logging into your Kling AI account, navigate to the Image to Video section from the dashboard.
Choose a high-quality image with good lighting and clear details.
While almost any image can work, the best results usually come from:
- High-resolution photos.
- AI-generated artwork.
- Landscape photography.
- Portrait images with clean backgrounds.
- Images containing depth and multiple visual layers
Low-resolution or blurry images often produce weaker animations because the AI has less visual information to work with.
Step 2 — Write a Detailed Prompt
This is where many beginners make their biggest mistake.
They upload an image and simply type:
“Animate this image.”
Technically, it works.
But the results rarely look cinematic.
Instead, describe exactly how you want the scene to behave.
For example:
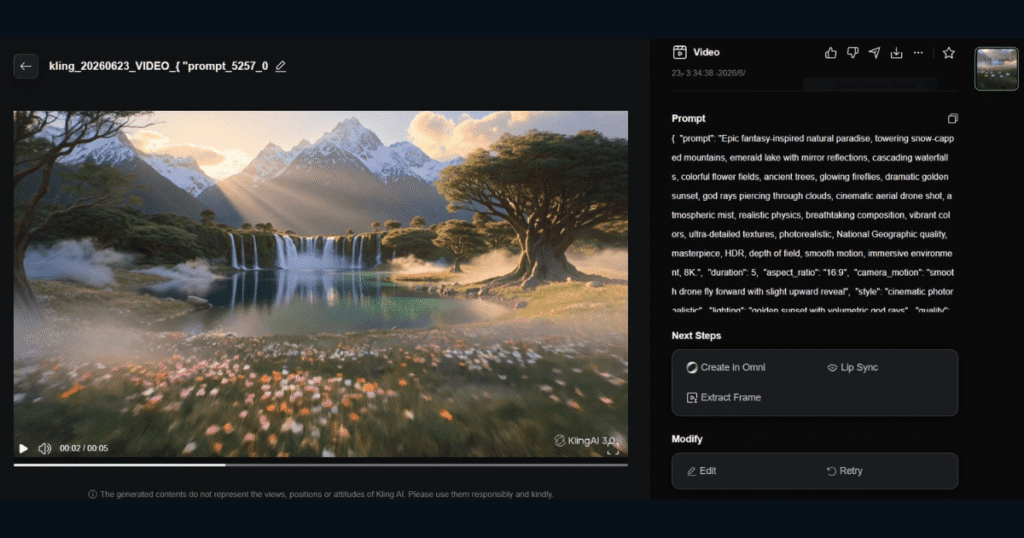
A slow cinematic drone shot flying toward a peaceful mountain lake at sunrise, soft golden light reflecting on the water, gentle wind moving the trees, realistic clouds drifting slowly, ultra-realistic, cinematic color grading, volumetric lighting, shallow depth of field.
Notice that this prompt doesn’t just describe the image.
It describes:
- camera movement.
- lighting.
- atmosphere.
- weather.
- motion.
- cinematic style
The AI now has much more information to work with, resulting in significantly better output.
🎬 Ready to Animate Your First Image?
Now that you know how to upload an image and write a detailed prompt, it’s time to see the results for yourself.
👉 Start Creating with Kling AI for Free
Best Kling AI Image to Video Settings for Cinematic Results
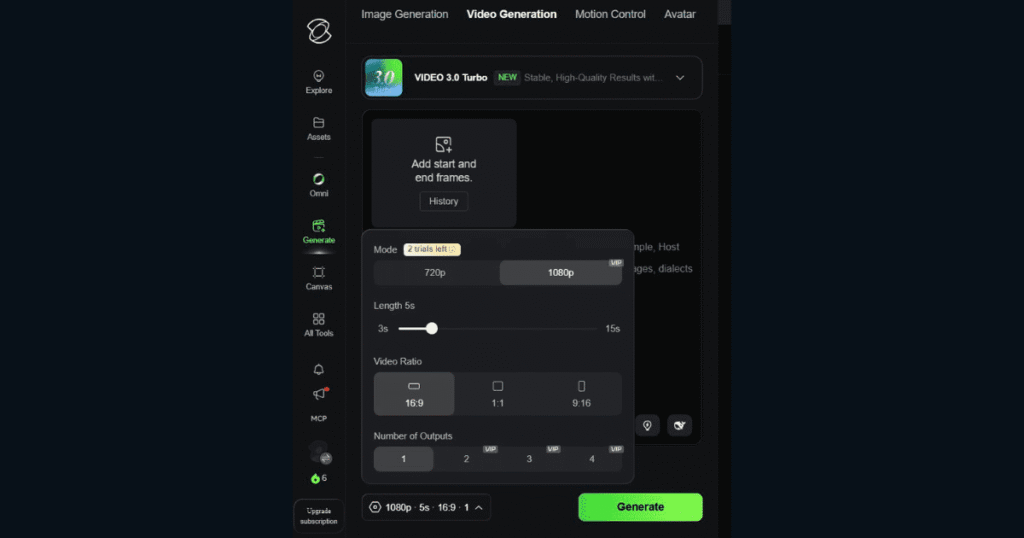
Uploading a high-quality image is only the first step toward creating stunning AI videos. The final result also depends on choosing the right generation settings and writing a well-structured prompt.
Many beginners assume that selecting the highest resolution automatically produces better videos. While image quality is important, factors like video length, aspect ratio, prompt quality, and your source image often have a much greater impact on the final output.
Here are the most important settings to consider before generating your video.
Resolution
Kling AI allows you to generate videos in different resolutions, including 720p, 1080p, and, for eligible plans, 4K.
- 720p is suitable for testing ideas while using fewer credits.
- 1080p offers an excellent balance between quality and credit consumption.
- 4K is ideal for professional projects where maximum detail is required.
Video Length
Choose the shortest duration that effectively tells your story.
Shorter videos generate faster and consume fewer credits, making them ideal for testing prompts before creating longer versions.
Aspect Ratio
Select the aspect ratio based on where your video will be published:
- 16:9 – YouTube and widescreen videos.
- 9:16 – TikTok, Instagram Reels, and YouTube Shorts.
- 1:1 – Instagram posts and some social media ads.
Number of Outputs
If your credit balance allows, generating two or more variations can help you compare results and choose the best version without rewriting your prompt.
Native Audio
If your project benefits from environmental sounds or AI-generated audio, enable Native Audio. Otherwise, you can leave it disabled and add your own soundtrack during editing.
How to Control Camera Movement in Kling AI
One of the most effective ways to improve your videos in Kling AI Image to Video is by describing camera movement directly in your prompt.
Unlike some AI video generators, Kling AI 3.0 doesn’t include dedicated camera movement controls in the generation panel. Instead, the AI interprets cinematic camera instructions written inside your prompt.
For example, you can use phrases like:
| Camera Prompt | Best Use Case |
| Slow dolly in | Portraits, emotional scenes |
| Slow dolly out | Landscapes, revealing large environments |
| Orbit around the subject | Characters, products, statues |
| Pan left | Nature scenes, architecture |
| Pan right | Travel videos, cityscapes |
| Drone fly-through | Mountains, forests, cinematic intros |
| Tracking shot | Walking characters, moving vehicles |
| Handheld camera | Action scenes, documentaries |
These instructions tell Kling AI how the virtual camera should move, resulting in videos that feel much more cinematic and professional.
Example Prompt
A peaceful mountain lake at sunrise, slow cinematic dolly in, soft golden light, gentle breeze moving the trees, realistic water reflections, ultra-detailed, cinematic color grading.
Notice how the camera movement (slow cinematic dolly in) is written naturally inside the prompt rather than selected from a settings menu.
Best Images for Kling AI Image to Video
One question appears again and again:
Why do some images produce incredible videos while others look strange?
The answer is surprisingly simple.
AI performs better when it understands the scene.
Images with clear lighting, visible depth, and strong composition provide much more information for the model to animate naturally.
Images That Usually Produce the Best Results
- Landscape photography.
- Fantasy environments.
- AI-generated artwork.
- Portraits with clean backgrounds.
- Product photography. Architecture.
- Wildlife photography.
These images contain clear subjects and enough visual information for the AI to generate realistic motion.
Images That Often Produce Poor Results
Avoid using:
- Low-resolution images.
- Blurry photos.
- Overexposed images.
- Very dark scenes.
- Crowded compositions.
- Heavy text overlays.
- Multiple overlapping subjects.
The cleaner your image is, the easier it becomes for Kling AI to predict realistic movement.
How to Write Better Prompts for Kling AI Image to Video
This is where beginners improve the fastest.
Most users focus only on describing the object.
Professional creators describe the entire scene.
Instead of writing: “A castle.”
Write something like: A majestic medieval castle at sunrise, cinematic lighting, slow drone push-in, realistic clouds, warm golden sunlight, birds flying naturally, volumetric fog, ultra-realistic details, dramatic atmosphere, smooth camera movement.
Notice how this prompt includes:
- Environment.
- Lighting.
- Camera movement.
- Atmosphere.
- Motion.
- Mood.
- Style.
Each detail helps Kling AI Image to Video understand exactly what you want.
A Simple Prompt Formula That Works
Whenever you’re unsure what to write, use this structure:
Subject + Environment + Camera Movement + Lighting + Motion + Mood + Style
Example:
A young traveler standing beside a crystal-clear mountain lake, slow cinematic dolly shot, sunrise lighting, gentle wind moving the trees, realistic reflections, ultra-detailed, cinematic color grading, shallow depth of field.
This formula works surprisingly well for almost every type of project.
💡 Want Even Better Results?
If you don’t want to build prompts from scratch every time, explore our collection of 25 proven Kling AI Prompts. They’re designed for landscapes, storytelling, YouTube videos, fantasy scenes, and cinematic animations—and they’re easy to copy, customize, and use as a starting point.
Common Mistakes Beginners Make
Even powerful AI models can’t compensate for poor input.
Here are the most common mistakes that reduce video quality.
Using Very Short Prompts
A prompt like: “Make this move.”
doesn’t give the AI enough direction.
Instead, explain:
- what should move.
- how it should move.
- how the camera behaves.
- what the lighting looks like.
- what atmosphere you want.
More context usually leads to more consistent results.
Choosing the Wrong Camera Motion
Fast camera movements don’t fit every scene.
A peaceful forest should not have aggressive handheld movement.
Likewise, an action scene may feel boring if the camera barely moves.
Always match the camera movement to the mood of the image.
Ignoring Lighting
Lighting dramatically affects realism.
Words such as:
- golden hour.
- soft morning light.
- moonlight.
- dramatic sunset.
- neon lighting.
- volumetric light.
can completely transform the final output.
Uploading Poor-Quality Images
This is probably the biggest mistake of all.
No AI model can fully recover details that aren’t present in the original image.
Whenever possible, upload the highest-quality version available.
Generating Without Experimenting
Very few creators achieve their best result on the first attempt.
Professional users often generate several variations, compare them, adjust the prompt slightly, and choose the strongest version.
A small prompt change can completely change the final animation.
🚀 Ready to create longer and higher-quality videos?
The free version of Kling AI is a great way to learn the platform, but if you plan to create content regularly, upgrading gives you more monthly credits, faster generation, and access to higher-quality exports. It’s a practical option once you start publishing videos consistently.
Best Use Cases for Kling AI Image to Video
One of the biggest strengths of Kling AI Image to Video is its versatility. It isn’t designed for one type of creator—it can be used across many industries and creative projects.
Let’s look at some of the most effective ways people are using it today.
YouTube Faceless Channels
Faceless YouTube channels continue to grow rapidly, and high-quality visuals are one of the biggest challenges creators face.
Instead of spending hours searching for stock footage, you can create unique cinematic scenes from a single image.
For example:
- Historical documentaries.
- Fantasy storytelling.
- Motivational videos.
- Relaxation channels.
- Travel documentaries.
- AI-generated short films.
Combining Kling AI Image to Video with realistic narration can dramatically increase viewer engagement while giving your videos a unique visual identity.
Social Media Content
Short-form platforms like TikTok, Instagram Reels, Pinterest, and YouTube Shorts reward visually engaging content.
A static image often struggles to capture attention.
A moving cinematic scene, however, immediately catches the viewer’s eye.
Creators frequently use Kling AI Image to Video to animate:
- AI artwork.
- Character portraits.
- Product showcases.
- Travel photography.
- Digital illustrations.
- Fantasy landscapes.
Even subtle motion can significantly improve watch time.
Product Marketing
Online stores are beginning to replace static product photos with AI-generated product videos.
Imagine uploading a single product image and transforming it into a smooth cinematic showcase with:
- Slow camera movement.
- Dynamic lighting.
- Soft reflections.
- Luxury-style presentation.
Without hiring a videographer.
For small businesses and creators with limited budgets, this opens up entirely new marketing possibilities.
Storytelling and Short Films
Writers and filmmakers are using Kling AI Image to Video to visualize scenes before production.
Instead of creating a storyboard with still images, they animate each scene to better communicate:
- Camera angles.
- Mood.
- Lighting.
- Character movement.
- Scene transitions.
This makes it easier to plan larger projects while reducing production costs.
💡 Many creators start with the free plan to test their ideas. Once they find a workflow that works, upgrading simply removes many of the limitations, allowing them to create more videos without constantly worrying about available credits.
Kling AI Image to Video vs Text to Video
A common question among beginners is:
Which feature should I use—Image to Video or Text to Video?
The answer depends on your goal.
Choose Image to Video if you:
- Already have a photo or AI artwork.
- Want consistent characters or environments.
- Need precise control over the starting frame.
- Want to animate existing images.
Choose Text to Video if you:
- Want to create a scene from scratch.
- Don’t have any source images.
- Need maximum creative freedom.
- Want the AI to design the entire composition.
For many creators, the best workflow combines both.
Start with Text to Video to generate a unique concept, then refine and expand it later using Kling AI Image to Video for more consistent animations.
Pro Tips for Better Kling AI Image to Video Results
If you’ve mastered the basics, these advanced tips can noticeably improve your videos.
Use Images with Clear Depth
Images containing foreground, middle ground, and background elements usually produce much more natural camera movement.
For example:
- A person standing in front of mountains.
- A road leading toward a city.
- Trees surrounding a lake.
Depth gives the AI more information to animate.
Think Like a Cinematographer
Instead of asking yourself: “What should move?”
Ask: “How would a professional filmmaker shoot this scene?”
Would they use:
- A slow drone shot?
- A cinematic push-in?
- A smooth orbit?
- A dramatic reveal?
The more cinematic your thinking becomes, the better your prompts will be.
Don’t Overload the Prompt
Many beginners assume that longer prompts always produce better videos.
Not necessarily.
A prompt filled with unrelated styles, conflicting camera movements, and excessive effects can confuse the AI.
Aim for clear, descriptive, and logical instructions rather than stuffing every cinematic keyword into a single prompt.
Test Multiple Variations
Professional creators rarely settle for the first result.
Generate several versions of the same scene while changing only one variable at a time, such as:
- Camera movement.
- Lighting.
- Mood.
- Weather.
- Motion strength.
After a few iterations, you’ll quickly discover which combinations work best for your style.
💡 Looking to Get Even More from Kling AI?
If you’re planning to use the platform regularly, it’s worth understanding how the credit system works before creating large batches of videos. Our detailed Kling AI Pricing guide explains every plan, credit cost, and which subscription offers the best value for different types of creators.
This can help you avoid wasting credits while choosing a plan that matches your workflow.
Is Kling AI Image to Video Worth Using?
For most creators, the answer is yes.
While no AI video generator is perfect, Kling AI Image to Video consistently delivers some of the most realistic motion currently available to the public.
Its strengths become especially clear when working with:
- Landscape photography.
- AI-generated artwork.
- Cinematic storytelling.
- Product marketing.
- Social media videos.
- YouTube content.
The learning curve is relatively short, and once you understand how prompts, camera movement, and image quality work together, you’ll be able to create videos that look significantly more professional than simple one-click generations.
Frequently Asked Questions About Kling AI Image to Video
Is Kling AI Image to Video free?
Yes, Kling AI offers a free plan that allows users to test the Kling AI Image to Video feature before upgrading. However, the free version includes limited credits, which means you may need a paid subscription if you generate videos frequently or require higher-quality outputs.
If you’re unsure which plan fits your needs, our detailed Kling AI Pricing guide compares every subscription, explains the credit system, and helps you choose the most cost-effective option.
What images work best with Kling AI Image to Video?
For the highest-quality results, use:
- High-resolution images.
- AI-generated artwork.
- Portraits with clean backgrounds.
- Landscape photography.
- Product images.
- Scenes with visible depth and good lighting.
Avoid blurry, compressed, or low-quality images, as they provide less information for the AI to animate naturally.
Can I use Kling AI Image to Video for YouTube?
Absolutely.
Many creators use Kling AI Image to Video to produce:
- Faceless YouTube videos.
- Documentary visuals.
- Storytelling animations.
- Travel videos.
- Motivational content.
- AI short films.
- B-roll footage.
The platform is especially useful for creators who want cinematic visuals without expensive production equipment.
Does prompt quality affect the final video?
Yes—more than most beginners realize.
A detailed prompt helps the AI understand:
- Camera movement.
- Lighting.
- Mood.
- Subject motion.
- Environment.
- Overall cinematic style.
Even small improvements to your prompt can dramatically improve the final animation.
If you’re looking for inspiration, don’t miss our collection of Best Kling AI Prompts, where you’ll find ready-to-use examples for landscapes, storytelling, YouTube videos, fantasy scenes, and more.
Which is better: Image to Video or Text to Video?
Neither feature is universally better—they serve different purposes.
Choose Image to Video when you already have an image you want to animate.
Choose Text to Video when you’re starting with an idea and want the AI to generate the entire scene from scratch.
Many experienced creators combine both workflows to achieve the best balance of creativity and consistency.
⭐ If you’re serious about creating AI videos, the best way to improve is by practicing. Start with the free version, experiment with different prompts, and once you feel comfortable with the platform, consider upgrading to unlock faster generation and more creative freedom.
👉 Start Creating with Kling AI
Final Thoughts on Kling AI Image to Video
After testing the platform across different types of projects, it’s easy to understand why Kling AI Image to Video has become one of the most talked-about AI video generation features.
What makes it stand out isn’t just its ability to animate a still image—it’s the quality of the motion, the cinematic feel of the camera movements, and the level of creative control it gives users through well-crafted prompts.
Of course, no AI tool is perfect. Your results will always depend on the quality of your source image, the prompts you write, and the settings you choose. However, once you understand these fundamentals, you’ll be able to create videos that look significantly more polished and engaging than simple one-click animations.
Whether you’re building a faceless YouTube channel, producing marketing content, creating short films, or simply experimenting with AI creativity, Kling AI Image to Video is a feature well worth learning.
🚀 Start Creating Cinematic AI Videos Today
You’ve learned how to turn images into videos, control camera movement, write better prompts, and create more realistic animations. Now it’s time to put everything into practice.
Whether you’re creating YouTube content, social media videos, product marketing, or cinematic scenes, Kling AI gives you the tools to bring your ideas to life.
👉 Try Kling AI for Free and Create Your First AI Video
🚀 Continue Learning Kling AI
If you found this guide helpful, these articles will help you get even better results:
- Kling AI Review — Explore all the platform’s features, strengths, weaknesses, and our honest verdict before investing more time.
- Kling AI Tutorial — Learn the complete workflow from account setup to generating your first AI video.
- Kling AI Pricing — Compare every membership plan, understand the credit system, and choose the best option for your budget.
- Best Kling AI Prompts — Copy, customize, and use 25 proven prompts designed to create cinematic AI videos.
- Kling AI vs Runway (2026): Which AI Video Generator Is Better? — Compare the image-to-video capabilities of Kling AI and Runway, including motion quality, realism, consistency, and ease of use.
- Kling AI Free (2026): How to Use Kling AI Without Paying — Learn how to access Kling AI without a subscription, maximize your free credits, understand the platform’s limitations, and decide when upgrading to a paid plan is actually worth it.
- Kling AI Motion Control (2026) — Discover how to create realistic AI character animation using Motion Control, reference videos, and advanced motion transfer techniques.
- Kling AI Voice Control (2026): Complete Guide — Master AI voices, Native Audio, and realistic lip sync in Kling AI.
- Runway AI Review (2026): Discover whether Runway is the best AI video generator for creators in 2026.
- Kling AI Canvas Review — Discover how Kling Canvas helps organize multi-scene AI projects with templates, storyboards, and a streamlined creative workflow.
- Kling AI API Review — Learn how to integrate Kling AI into your applications using the official API, explore supported models, pricing, authentication, and developer tools.
Together, these guides will give you a complete understanding of the platform and help you unlock its full creative potential.